Calling Azure Service Bus from Azure API Management Service
Azure API Management Service (APIM) can seamlessly integrate with Azure Service Bus, allowing you to send messages to both queues and topics, including their respective subscriptions. To achieve this integration, a few configurations and authentication steps are necessary, ensuring a secure and efficient communication channel between your API Gateway and Service Bus resources.
Authentication
For secure message transmission between APIM and Service Bus, proper authentication is crucial. Here’s how you can establish the connection:
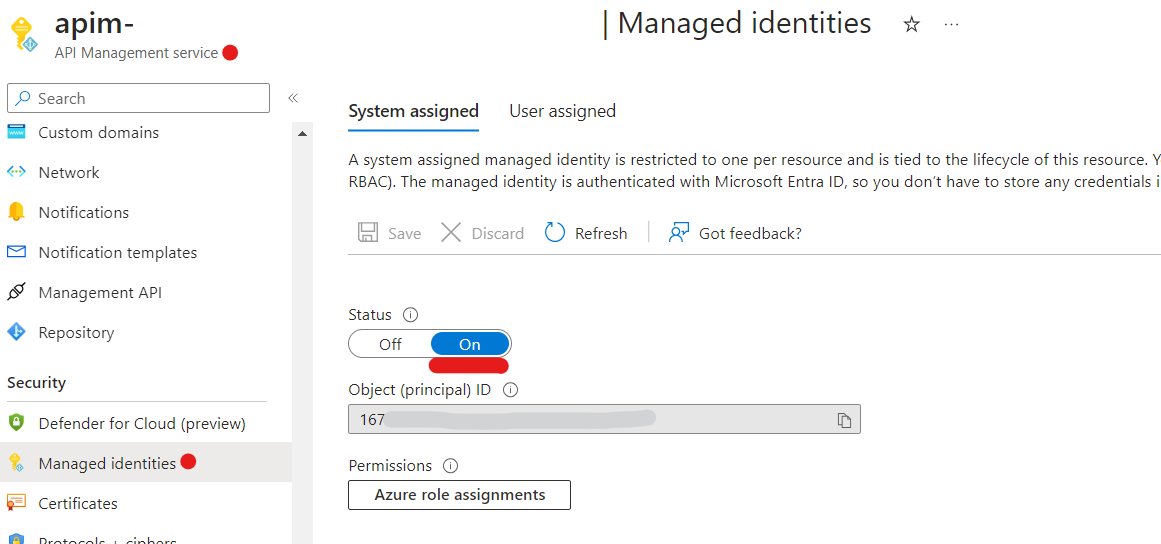
- Activate Managed Identity: Start by activating a system-assigned Managed Identity from the API Management Service. This identity will serve as the authentication mechanism.
-
Assign Roles in Service Bus
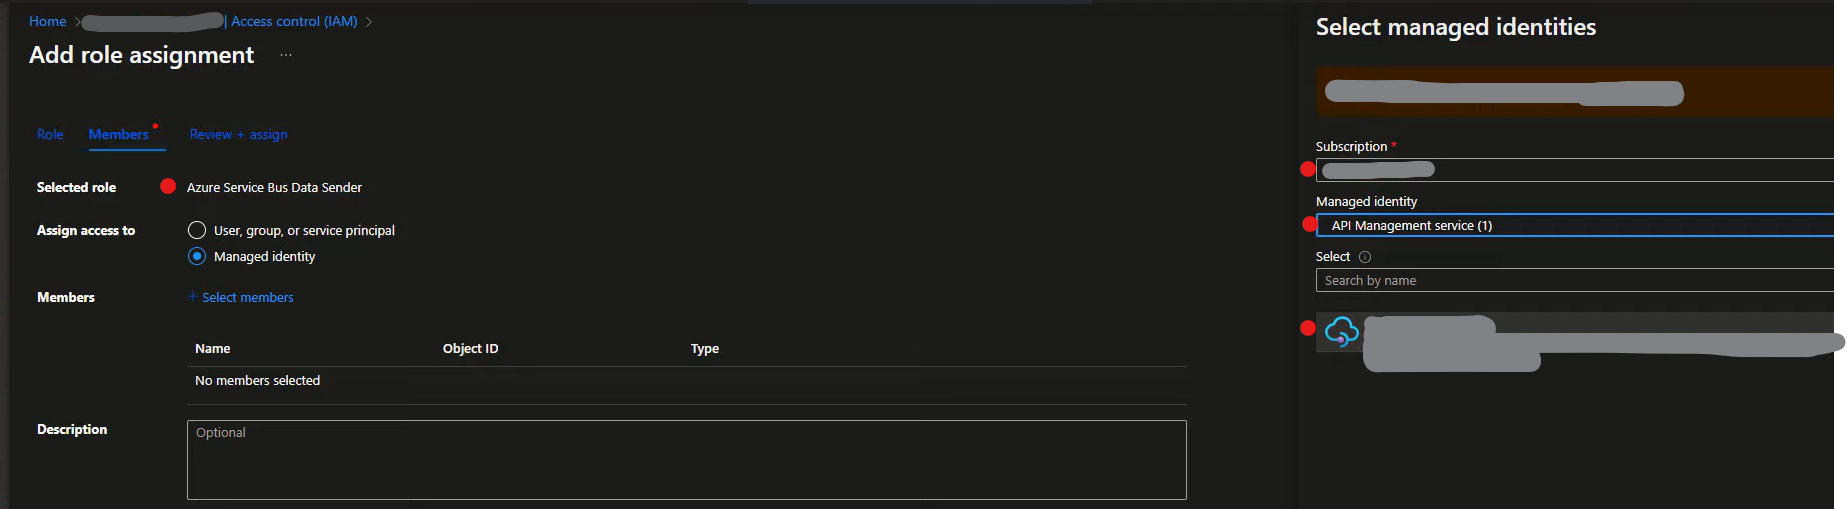
2a. In the Azure Service Bus resource, navigate to the Access Control menu, then select Role Assignments and click Add.
2b. From the Role tab, assign roles such as Azure Service Bus Data Receiver and/or Azure Service Bus Data Sender.
2c. In the Assign access to group, specify the Managed identity from the available options and select the relevant API Management service.
Api Management Configuration
To enable APIM to send messages to Service Bus, you must define a new operation and configure the inbound rules appropriately. The following inbound policy should be set for the operation:
<policies>
    <inbound>
        <base />
            <authentication-managed-identity resource="https://servicebus.azure.net" output-token-variable-name="msi-access-token" ignore-error="false" />
            <set-header name="Authorization" exists-action="override">
                    <value>@((string)context.Variables["msi-access-token"])</value>
            </set-header>
            <set-header name="BrokerProperties" exists-action="override">
                <value>@("{ \"CorrelationId\": \"TestCorelationId\" }")</value>
            </set-header>
            <set-backend-service base-url="https://YOUR-SERVICE-BUS-URL.servicebus.windows.net" />
            <rewrite-uri template="YOUR-TOPIC-OR-QUEUE/messages" />
    </inbound>
...
</policies>
Explanation of Inbound Policy:
This inbound policy performs authentication using managed identity, sets custom headers (“Authorization” and “BrokerProperties”), specifies the backend service URL, and rewrites the request URI before forwarding the request to the specified Service Bus endpoint.
-
Authentication (authentication-managed-identity): Requests a managed identity (MSI) against the specified Azure Service Bus resource, storing the resulting access token in the variable msi-access-token.
-
Setting Headers (set-header): Custom headers like Authorization and BrokerProperties are set for the request. The Authorization header contains the access token, and the BrokerProperties header includes additional message properties like correlation IDs.
The full list properties that can be set looks like this:
BrokerProperties: { "SessionId": "{27729E1-B37B-4D29-AA0A-E367906C206E}", "MessageId": "{701332E1-B37B-4D29-AA0A-E367906C206E}", "TimeToLive" : 90, "CorrelationId": "{701332F3-B37B-4D29-AA0A-E367906C206E}", "SequenceNumber" : 12345, "DeliveryCount" : 2, "To" : "http://contoso.com", "ReplyTo" : "http://fabrikam.com", "EnqueuedTimeUtc" : " Sun, 06 Nov 1994 08:49:37 GMT", "ScheduledEnqueueTimeUtc" : " Sun, 06 Nov 1994 08:49:37 GMT"}
-
Backend Service Configuration (set-backend-service): Specifies the base URL of the Service Bus endpoint where requests will be forwarded.
-
URI Rewriting (rewrite-uri): Directs the request to a specific topic or queue by rewriting the URI. The template should be the topic/queue name followed by “/messages”.